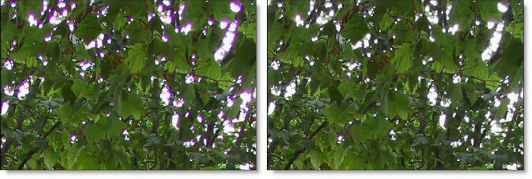
NEW IN CONTINUUM 2021, the BCC+ DeFringe filter isolates and removes the various types of color fringing. Purple or blue fringing around overexposed areas is a result of sensor overloading in video as well as digital still cameras.

Presets and the FX Editor
The FX Editor provides a convenient way to store and retrieve factory installed and/or user generated filter presets. To select a preset, open the FX Editor interface and pick one from the Presets panel. Click the apply button in the FX Editor to return to the host user interface.
To save a custom preset, click the “Create Custom Preset” icon in the top right corner of the parameter list, next to the filter name, set a name for the new custom preset in the dialog that appears and click done.
Filter Parameters
Red
- Red: Adjusts the saturation of red values in areas defined by the Position and Range controls. Positive values saturate, negative values desaturate.
- Position: A matte is generated to isolate red fringing. The areas that are white in the red matte are the areas that will be defringed. Moving the Position slider will change the hue that is used for the red matte.
- Range: Increases or decreases the range of values considered as red fringing. A low Range value indicates a narrow range of values, while a high Range value indicates a large range of values.
Green, Blue, Cyan, Magenta, and Yellow
The Green, Blue, Cyan, Magenta and Yellow groups work in a similar fashion to the Red group.
PixelChooser: The BCC PixelChooser provides a way for the user to select which pixels in the filtered source are actually going to be affected by the filter, via the generation of image based mattes, gradient mattes and vector shape masks. Mocha planar tracking and vector shape masking options are included in the PixelChooser, which allows for the generation of motion-tracked mask shapes as a hold-back mask.
For more information on the PixelChooser, Click Here.
Working with The Filter
- Apply BCC+ DeFringe from the BCC Lens category.
- Determine the color of the fringing that you would like to remove. Let’s say that you have purple fringing in the highlight areas of your image.
- Go to the Magenta parameter group.
- Move the Magenta slider to the right until the purple fringing is gone.
- If the purple fringing is not being removed when the Magenta slider is adjusted, you may need to adjust the Position slider.
- Change your View to Magenta to see the matte values.The areas that are white in the matte are the areas that will be defringed.
- Change your View back to Output.
- Move the Position slider to the right or left until you see the fringing go away.This may be necessary if your purple fringing is not the same hue of what we consider to be magenta.
- If there is still some magenta left, you may want to increase the value of the Range slider to include more values considered as magenta.