NEW IN CONTINUUM 2021 the BCC+ Detail filter presents a new technique for performing selective sharpening, detail enhancement and edge aware smoothing. Our approach decomposes the image into three detail layers: Coarse, medium and fine. Each of the detail layers can be manipulated separately in various ways, for instance, sharpening or smoothing. Add to that sophisticated, but easy to use masking and you have quick isolation of image features for selective filtering.

Presets and the FX Editor
The FX Editor provides a convenient way to store and retrieve factory installed and/or user generated filter presets. To select a preset, open the FX Editor interface and pick one from the Presets panel. Click the apply button in the FX Editor to return to the host user interface.
To save a custom preset, click the “Create Custom Preset” icon in the top right corner of the parameter list, next to the filter name, set a name for the new custom preset in the dialog that appears and click done.
Filter Parameters
Coarse: Adjusts the Coarse detail layer. Increasing the value sharpens while decreasing the value smooths.
Medium: Adjusts the medium detail layer. Increasing the value sharpens while decreasing the value smooths.
Fine: Adjusts the fine detail layer. Increasing the value sharpens while decreasing the value smooths.
Gang
The Coarse, Medium and Fine slider values can be ganged together so that they all move simultaneously. This will generate an overall sharpening effect if the sliders are increased and an overall smoothing effect if decreased.
Matte
A matte can be used to limit the detail effect. Wherever there is white in the matte is where the detail adjustment will occur. Using advanced image slicing algorithms, mattes are created using luminance, hue, saturation, average, red, green, blue, cyan, magenta, and yellow values.
Extract On: allows for the selection of the type of matte. Select whichever type isolates the desired values. A matte is created based on one of the following:
- Luminance: A matte is created based on the luminance of the image.
- Hue: A matte is created based on the hue of the image. When adjusting the Position parameter, you are selecting different hues.
- Saturation: A matte is created based on the saturation of the image.
- Average: A matte is created based on the average of the image’s RGB values.
- Red: A matte is created based on the image’s red values.
- Green: A matte is created based on the image’s green values.
- Blue: A matte is created based on the image’s blue values.
- Cyan: A matte is created based on the image’s cyan values.
- Magenta: A matte is created based on the image’s magenta values.
- Yellow: A matte is created based on the image’s yellow values.
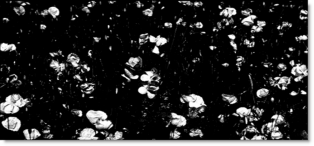
Position: Pinpoints the color values to be used in the matte. For a luminance matte, a Position value of 100 would make a white matte of the highlights and a value of 0 would make a white matte of the shadows. In the flower image below, look at how the matte varies for different Position values in a red extraction. When the Position is at a value of 100, the red flowers are shown as white in the matte.

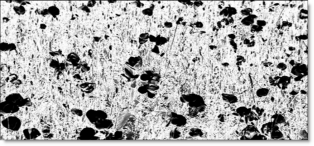
When the Position is moved to 50, the red flowers turn black.

Range: Increases or decreases the range of values in the matte. A low Range value indicates a narrow range of values. A high Range value indicates a large range of values included in the matte.
Blur: The matte is blurred by a quality blur.
PixelChooser: The BCC PixelChooser provides a way for the user to select which pixels in the filtered source are actually going to be affected by the filter, via the generation of image based mattes, gradient mattes and vector shape masks. Mocha planar tracking and vector shape masking options are included in the PixelChooser, which allows for the generation of motion-tracked mask shapes as a hold-back mask.
For more information on the PixelChooser, Click Here.
Working with The Filter
- Apply BCC+ Detail from the BCC Blur unit category.
- Click the BCC FX Editor button from the Effects and Presets banner. The FX Editor user interface opens and consists of Presets, Parameters and Viewer windows.
- Try out some of the presets. At the top left of the Presets window, the presets are categorized into various groups located inside a pop-up menu.
- In the Presets window, choose a new preset group from the pop-up menu to see a different set of filter presets.
- To sharpen or enhance detail, increase the values of the Detail > Coarse, Medium and Fine controls. Increasing the values sharpens/enhances detail while decreasing the values smooths/decreases detail.
- Enable Detail > Gang to move all sliders at once. If there are unwanted areas of the image that are being affected, you can optionally use a matte to isolate the effect.
- Activate Matte > Enable.
- Change your View to Matte to see the matte values. The idea here is to generate a matte that isolates the areas of the image that will be affected. The white areas of the matte are the areas that will be modified by the Detail controls. The matte has been preset to a highlight luminance matte, but this can be easily changed.
- Select the appropriate Matte > Extract On option for your image.
- If needed, change the Matte > Position parameter so that the image areas you are trying to smooth are as white as possible in the matte.
- Adjust the Matte > Range value so that the white values of the matte are limited as much as possible to the image areas that you are trying to isolate.
- Increase the Matte > Blur parameter if you want to soften the transition areas of the matte.
- Change your View to Output to see the filtered image.
- Click the Apply button to return to the host application.
The values of the parameter adjustments in the FX Editor user interface are transferred to your host application.