 |
 |
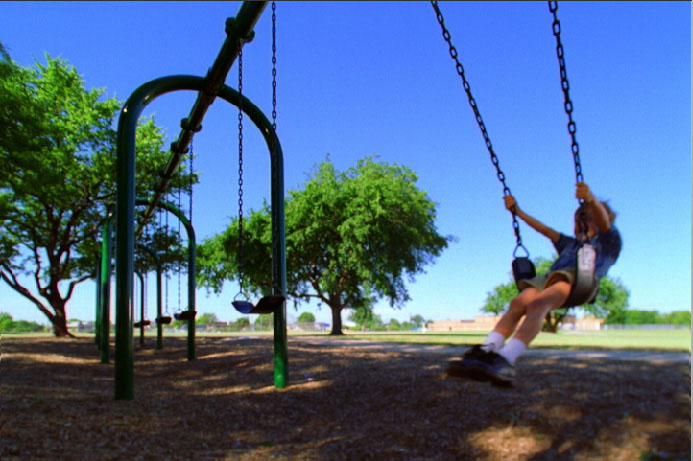
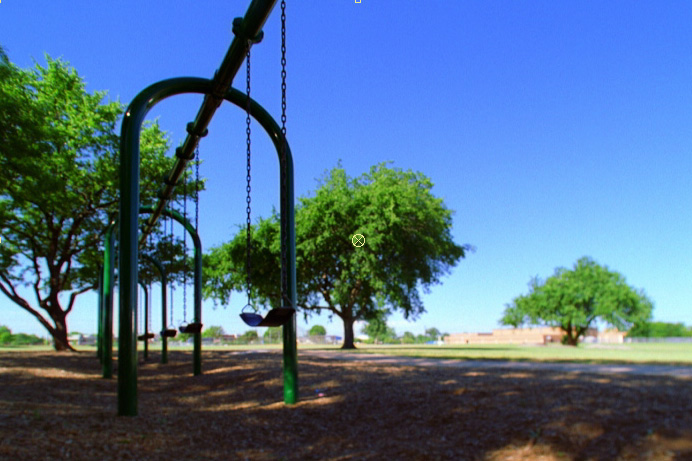
| Original image | Filtered image |
Overview
The BCC Motion Key filter allows you to isolate and remove a moving foreground object based on motion estimation. For example, you have a static shot of some buildings and a car passes by on the street in front of the buildings. You could use this filter to remove the car and replace it with the buildings.
Function
Presets and Common Controls
BCC filters come with a library of factory installed presets plus the ability to create your own custom presets and preview them with the BCC FX Browser™.
BCC filters also include common controls that configure global effect preferences and other host-specific effect settings.
For more information about working with presets and other common controls, Click Here.
Compare Mode
The BCC Compare Mode provides a convenient mechanism to compare the effect result with the original source layer. It provides several variations on basic split-screen views with the filtered clip placed next to the unedited original.
For more information on the Compare Mode, Click Here.
Compare Mode pop-up: Controls what is displayed by the Compare Mode. The options are:
- Off shows the output of the filter.
- Side By Side the left side of the output shows half of the incoming image, and the right side shows the same half of the image as processed by the filter. When in Side-by-Side mode, the corresponding Slide and Right Offset sliders become available.Wipe enables the user to interactively wipe the effect across the image. The left side of the wipe bar on the image output shows the unfiltered image, while the right side of the wipe bar shows the filtered result. When in Wipe mode, the corresponding Wipe slider becomes available.
- Wipe/Slide operates as a Wipe function when Wipe is selected in Compare Mode, and as a Slide function when Side-‐By-‐Side is selected in Compare Mode. When in Wipe mode, adjustments to this parameter moves the vertical wipe bar across the image; the region on the left of the wipe bar shows the original unfiltered image, while the region on the right shows the filtered result. When in Slide mode, adjustments to this parameter pans the image in the viewer window, maintaining the spatial relationship in the viewer between the before and after images.
- Right Offset provides a way to adjust the spatial relationship between the unfiltered original image and the filtered result in the viewer window. Adjustments to this parameter will offset the position of the filtered image in the viewer.
The Mode menu is a preview control with the following options.
- Choose Remove Area to remove the selected area.
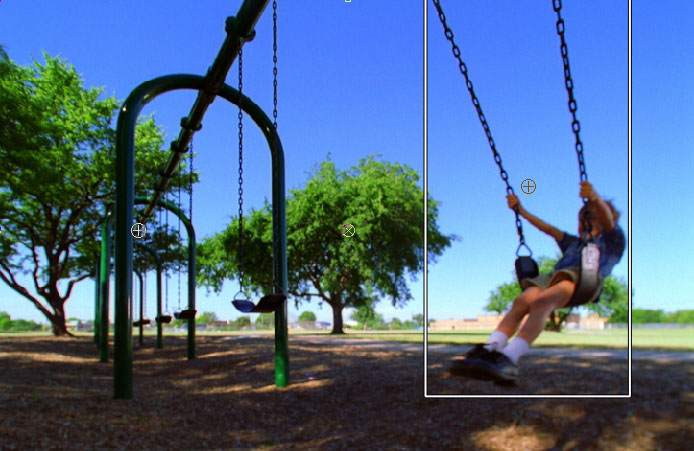
- Setup Region allows you to select the area to remove.
- Show Mask displays the image areas that were pieced together to replace the foreground object. The mask uses contrasting colors to distinguish the different areas. If the mask is empty or partly empty, there was an insufficient replacement area. This happens when the mask isn’t moving enough with respect to the background or the time range isn’t sufficient to uncover material for replacement.
- Warning: The Motion Key filter is very render intensive. There can be a considerable delay when switching between the Mode menu settings.
The Area Selection menu determines the shape of the target area to replace. Before adjusting these controls, set the Mode menu to Setup Region. In general it is easier to use the onscreen point controls to set up your area. Then use the Area Position/Offset controls for finetuning.
- When Oval is chosen, the Area Corner 1 and Area Corner 2 position points determine the upper left corner and lower right corners of a rectangle. The oval is generated within the dimensions of the rectangle. Area Scale determines the width of the oval area.
- When Rectangle is chosen, the Area Corner 1 and Area Corner 2 position points determine upper left hand corner and lower right hand corner of the rectangle. Area Scale determines the width of the rectangular area.
 |
| Selection Area Selection |
Ideally the background outside your replacement area should include good contrast as well as vertical and horizontal edge definition. Repeating or uniform patterns such as grass or sky can be difficult to replace.
The Area Position/Offset, Area Scale and Area Rotate parameters are useful if you want to animate the position and scale of the area to replace to increase the accuracy of the results. Area Position Offset allows you to offset the area to replace on the X and Y axis. Area Scale allows you to scale the area to replace. Area Angle allows you to rotate the area to replace.
First Replacement Frame and Last Replacement Frame set the first and last frame to be used as source material to fill the replacement area. This parameter can be used to limit the extent of a scene in a clip. The Motion Key filter will never search before the First Replacement Frame or after the Last Replacement Frame to find source material. These parameters use frame numbers, beginning at the start of the clip; they do not reference the clip’s time code.
Replacement Range limits the frames that can be used as source material relative to the current frame. For example, with a 30 fps project, if you set a value of 30, the filter would not use source material that was more than 1 second away from the current frame. If the First or Last Replacement Frame is within this range, it uses the closer of the two.
Feathering softens the edges of the masked area.
Luma Compensation helps to compensate for luminance changes in the image. At a value of 100, this parameter alters the luminance of the areas taken from alternate frames to match the luminance of the current frame. This helps to correct small changes in lighting.
The Tracking Mode menu replaces moving objects with background footage. This is mode does nothing in static shots.
- Translation tracks up, down, left and right motion with no changes in angle or perspective.
- +Rotation takes motion and rotation into account when replacing the background.
- +Zoom takes motion, rotation and scaling into account when replacing the background.
Optical Flow Parameter Group
These parameters estimate the motion between adjacent frames and use that information to calculate the motion of the background. Optical Flow analyzes the frames before and after the current frame to determine the pixels that need to be replaced. Pixels from adjacent frames are warped to cover the replacement area in the current frame.
Vector View Spacing – Use to adjust the number of on-screen vector lines.
Vector View Scale – Use to increase the scale of the on-screen vector lines.
Tracking Samples sets the number of samples that the filter takes. The filter breaks the images into a matrix; this parameter controls the number of cells in that matrix. Higher values produce more accurate analysis but increase rendering times.
Span sets the percent of the frame’s pixels that are used to determine the frame’s dominant motion. Increasing values can improve the tracking accuracy, but only to a point. This parameter is image-dependent. The default value works with a wide variety of images.
Edge Contrast sets a threshold for the minimum amount of detail in a region. Regions containing less detail than the threshold are treated as having no detail. If your image includes a lot of motion in areas that are very detailed or small objects, decrease this value. Min. Edge Contrast does not depend on the motion, only the texture and detail.
The Resolution menu adjusts the quality of the output. The optical flow estimation algorithm has sub-pixel accuracy, so Full may not be necessary to produce good results. In general, if the motion estimation appears incorrect, you may need to adjust the Velocity parameters, even if you increase the Optical Flow Quality.
- Full uses single pixel accuracy. Use this option if the motion of fine lines is blurred.
- Half uses half resolution accuracy, interpolated to full size.
- Quarter uses quarter resolution accuracy, interpolated to full size. This is the default.
- The remaining options use Eighth, Sixteenth, 32nd or 64th resolution accuracy.
- Note: If the Optical Flow does not look correct at a particular frame, move to that frame and reduce the resolution. Adjust the Velocity parameters until you see a better output. Then increase the Resolution menu setting and finetune as necessary.
Velocity Limit constrains the magnitude of motion estimation. Decrease this value if the motion estimation appears incorrect. This value corresponds to a percentage of the size and resolution of the Source Layer. For example, when working with a D1 image, the value of 100 corresponds to approximately 100 pixels.
Low Velocity Correction sets a threshold for detecting motion in a region. If the Optical Flow moves an area that should not move, adjust the Low Velocity Correction value.
Mix with Original blends the source and filtered images. Use this parameter to animate from the unfiltered to the filtered image without adjusting other settings or to reduce the effect by mixing with the source image. At a value of 100, the image is unaffected by the filter.
Motion Tracker
The BCC Motion Tracker allows you to track the motion of an object, then use the motion path to drive other geometric properties of the effect without the need for keyframing.
For more information on the Motion Tracker, Click Here.
In the Motion Key filter you can use the Motion Tracker to track the area to remove, by setting the Apply menu to Area Offset.