Overview
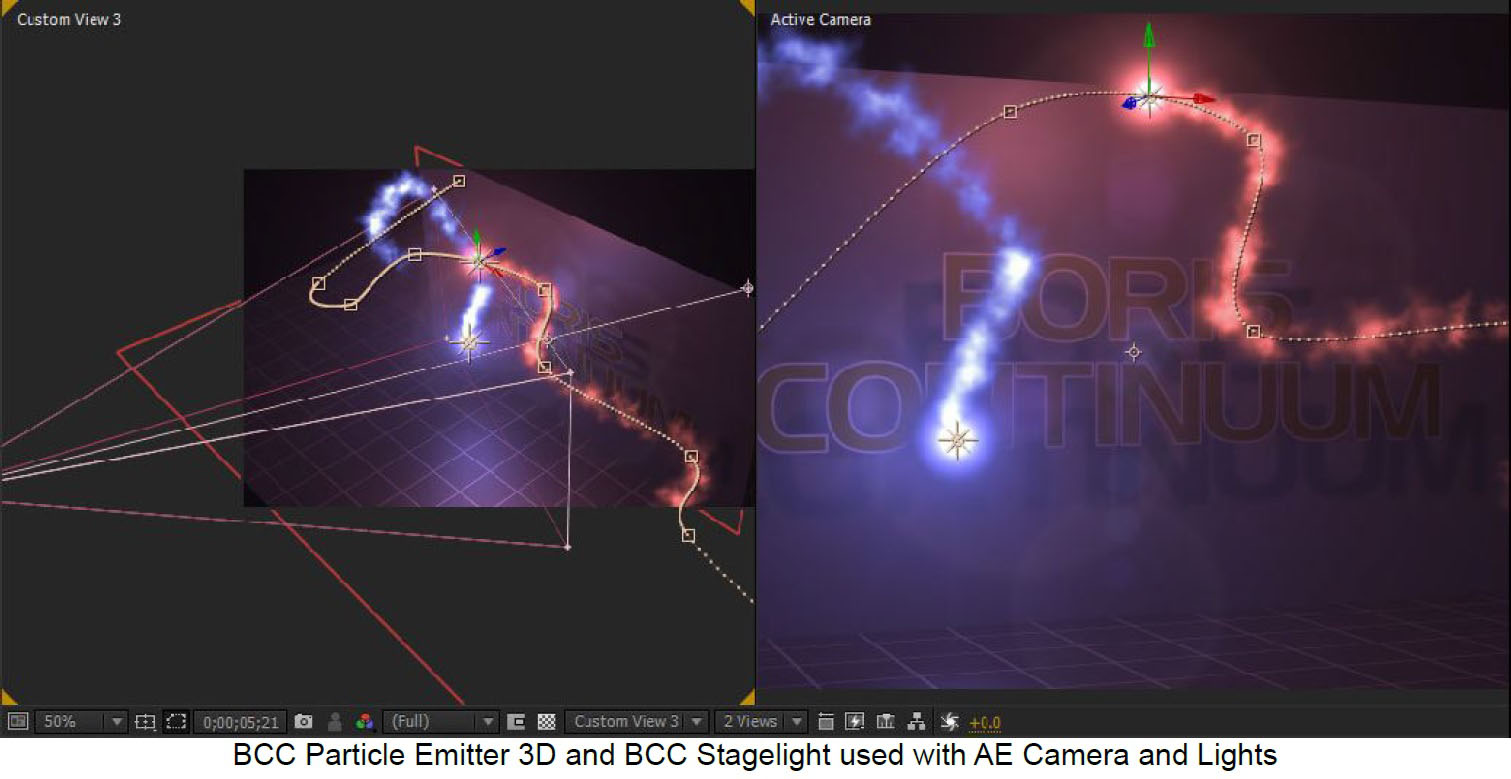
The BCC Particle Emitter 3D filter enables the generation of particle stream effects, and can be used to create a large variety of natural occurring effects such as smoke, fog, clouds, dust, fireworks, swarming bees etc etc. Users of Adobe After Effects can take advantage of the filters built-in support for AE native camera and lighting systems to generate dramatic scene fly-throughs and for non-AE users, the filter includes it’s own built-in 3D camera and lighting options.
This OpenGL based filter is hardware assisted for enhanced render performance.
Function
Presets and Common Controls
BCC filters come with a library of factory installed presets plus the ability to create your own custom presets and preview them with the BCC FX Browser™.
BCC filters also include common controls that configure global effect preferences and other host-specific effect settings.
For more information about working with presets and other common controls, Click Here.
Render
Anti-Aliasing is a smoothing process that applies to 3D and alpha edges in the effect if they appear jagged. Anti-Aliasing can slow down the responsiveness of working with the effect and so by design the plugin will not apply any Anti-Aliasing when the layer the effect is applied to is set to Draft mode. Also, using a higher AA setting will result in a somewhat slower render than using a lower AA setting so AA should only be set as high as is visually necessary to smooth the effect.
- Opacity Boost can be used to uniformly adjust the overall opacity of the particles. It can be useful used in relation to other parameters creating varied opacity such as Motion Blur, Opacity Evolution, Random Opacity, etc.
- Use Source As Mask will use the alpha channel of the layer to which the effect is applied to mask the output of the effect.
- Use Particle Intersection allows particles to intersect with each other. This render mode can be useful for some kinds of effects but does not support particle images with transparency well.
- Motion Blur offers various levels of motion blur to simulate camera shutter blur based on movement of the particles or camera
- Shutter Angle determines the spread of the motion blur when it is enabled
- Depth of Field Blur determines the amount of blur in front and behind the focus of the camera.
Use Comp Lights: When enabled, the filter will use AE lights enabled in the comp. The maximum number of total lights (including built-in and AE lights) the filter can use at once is 8. If there are more than 8 enabled AE lights in the comp it will use the 8 enabled light tracks that are topmost in the timeline.
Use Built-in Lights: There are also 3 built-in lights available. It’s possible to use both built-in and AE lights simultaneously. If enabled, the built-in lights will have priority over AE lights in terms of which lights get used if the total number of lights exceeds 8.
Use Comp Camera: When enabled, the filter will display the Cards from the perspective of the enabled AE camera whose track is topmost in the timeline. When Use Comp Camera is enabled, the Built-In Camera group is disabled.
Emitter
Birthrate: The number of particles born per second.
Particle Speed, Speed Random %, Speed Random Dist: Controls for the velocity of the particles, randomizing velocity between particles, and adjusting how the randomness is distributed between particles.
Particle Lifespan, Lifespan Random %: The number of seconds a particle will exist before dying off, and a control for randomizing lifespan between particles.
Pos X/Y/Z: 3D position coordinates of the emitter.
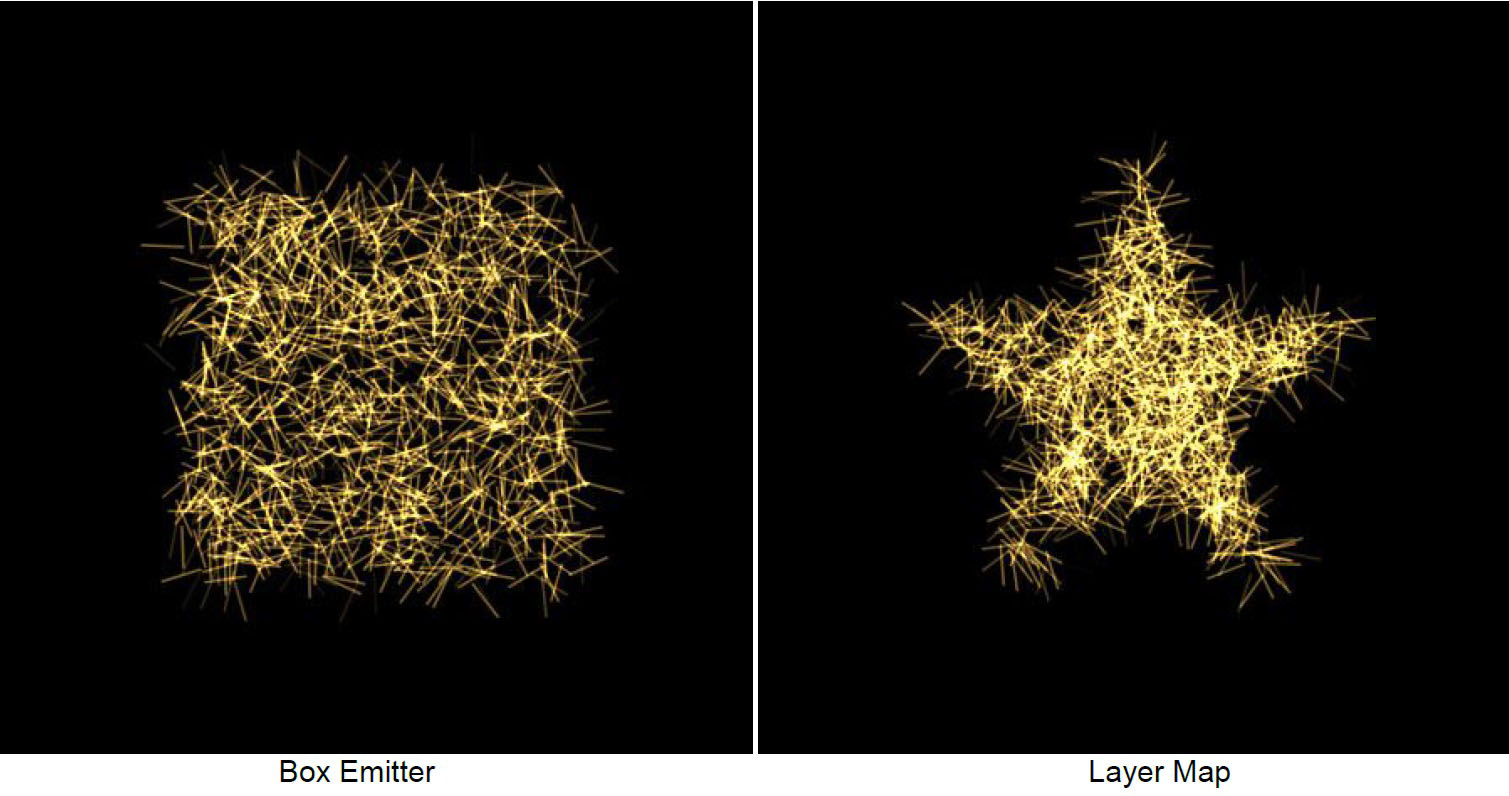
Emitter Shape: Offers choices for Point, Sphere, Box, or Layer Map.
Has Animated Alpha: For an emitter using the shape of Layer Map, the Layer Map may have animated alpha (or luma) properties. In order for the particles to reflect the animated history of the Layer Map, this checkbox must be enabled.
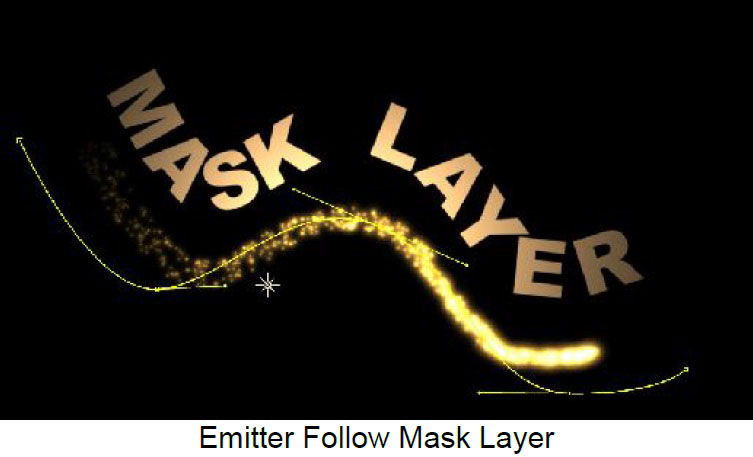
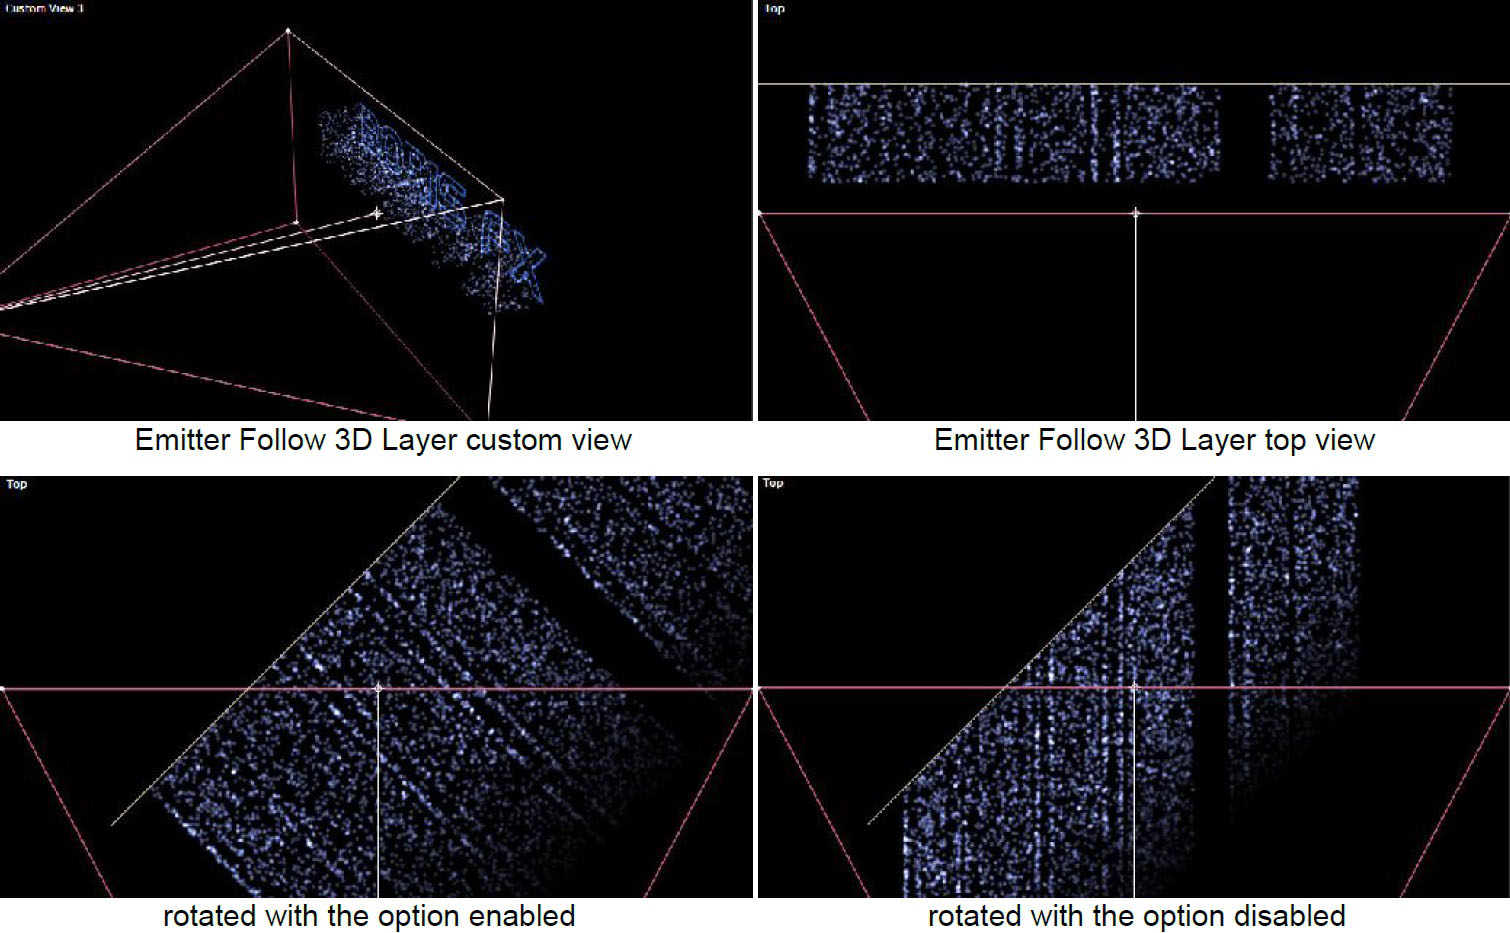
Emitter Follow: By default the emitter position is determined by the Pos X/Y and Pos Z parameters. Alternately there are options for having the emitter follow AE Comp Lights, other kinds of AE 3D Layers within the same comp, or follow along an AE Mask applied to the filter layer. When using the Emitter Follow 3D Layer option, the selected AE layer must be set to be a 3D layer or no particles will appear.
Emitter Layer: where to select the layer to be used by Layer Map and/or Emitter Follow 3D Layer.
Layer Map Mode: Luma or Alpha, particles will not be born where there is 20% or lower opacity (Alpha) or zero black (Luma).
3D Layer Rotates Emitter: When using the Emitter Follow 3D Layer option, this option will determine whether or not the direction of the articles rotates along with the 3D layer.
Follow Selected Lights: Where to determine which comp lights to follow when Emitter Follow Comp Lights option is enabled. Selecting an option which describes multiple lights will result in multiple emitter points.
Intensity Scales Birthrate: When using Emitter Follow Comp Lights, this option will result in the Intensity of the light affecting the birth rate of the particles.
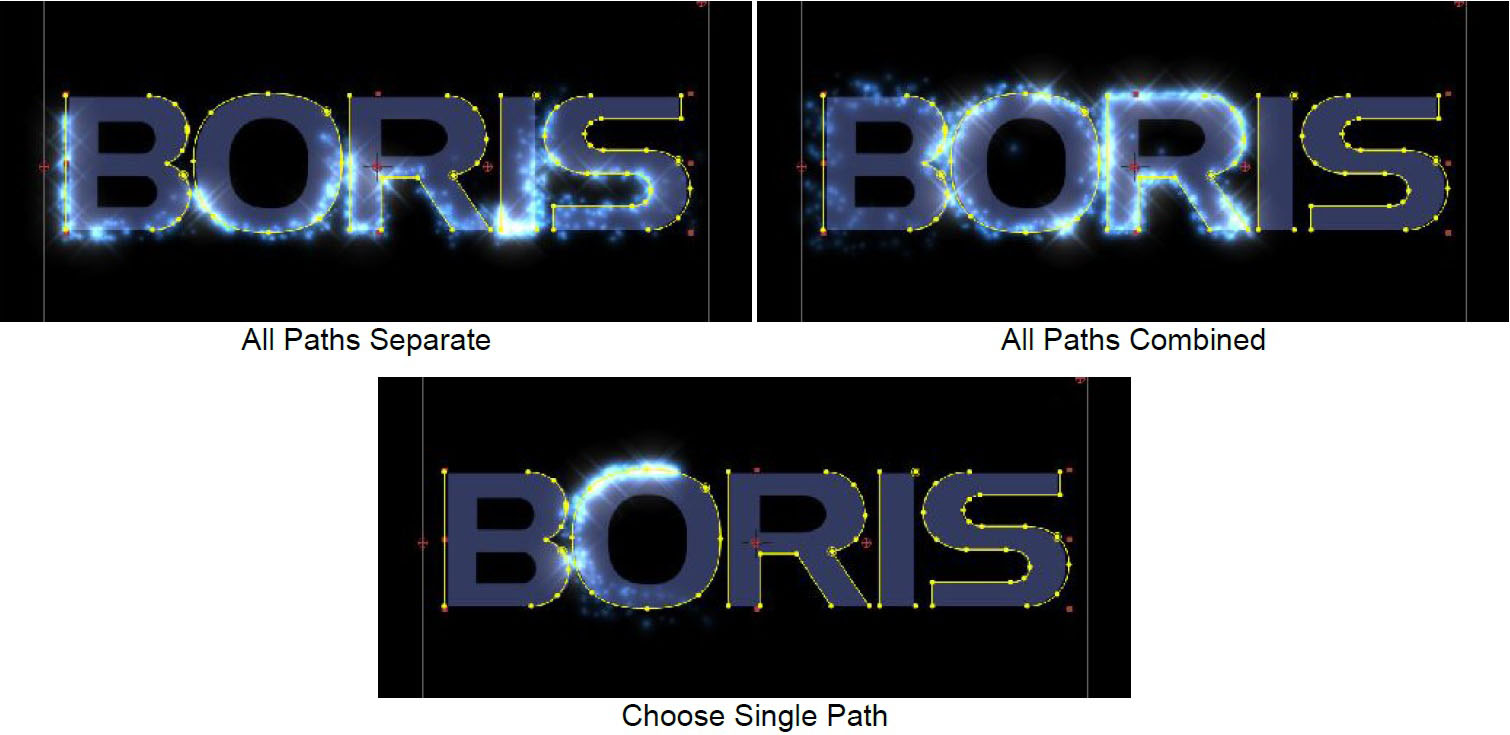
Choose Path: When using the Emitter Follow Mask Layer option, this is where you specify which mask(s) for the emitter to follow along. It’s possible to use all masks from the filter layer or specify a specific mask from the filter layer.
Use Global Path Location and Path Location: With this option enabled the Path Location slider determines the position of the emitter(s) along the mask(s), If it is disabled it is possible to use the Mask Expansion parameter on the mask to move the particles along the mask(s).
Path Scale: Can be used to increase or decrease the size of the path when using Emitter Follow Mask Layer.
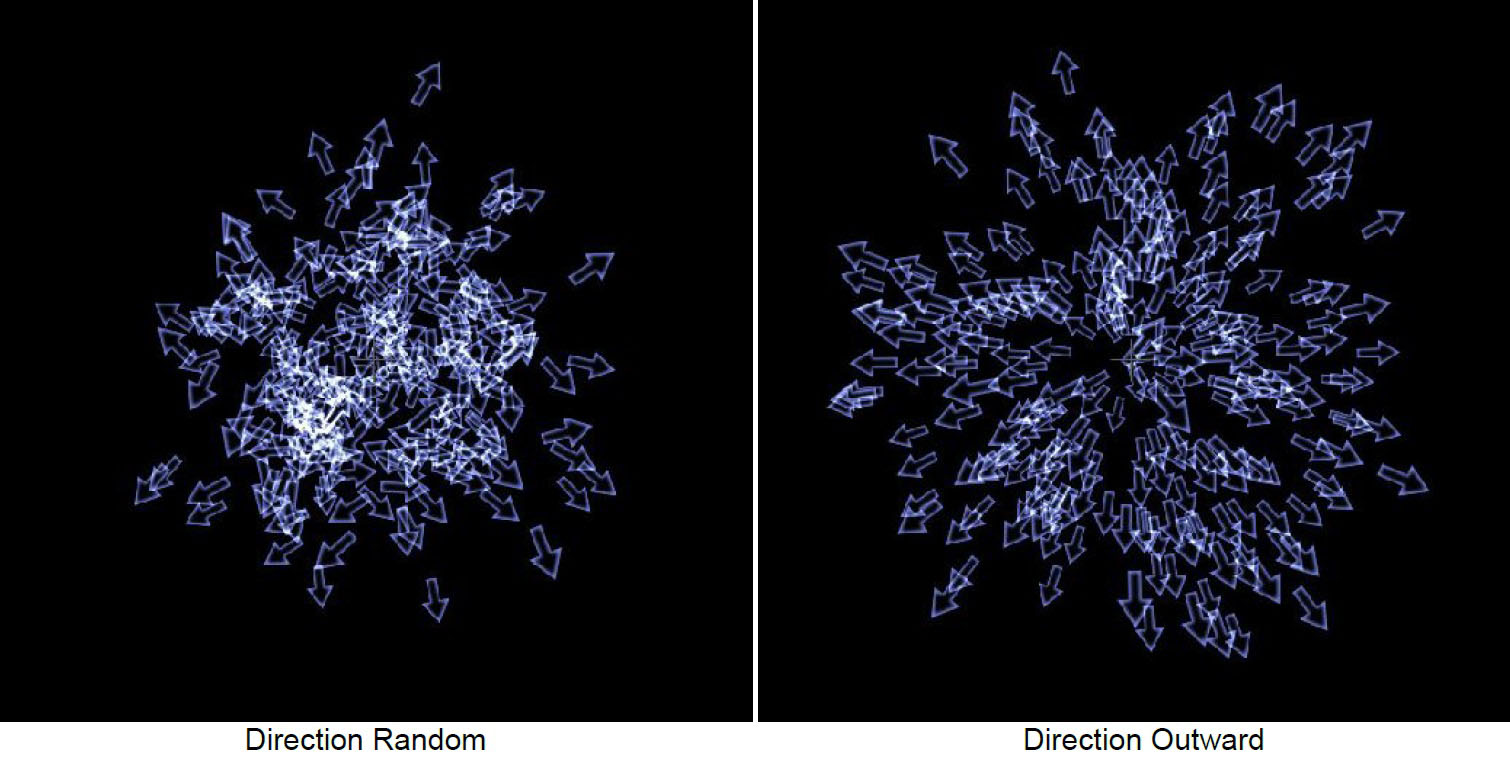
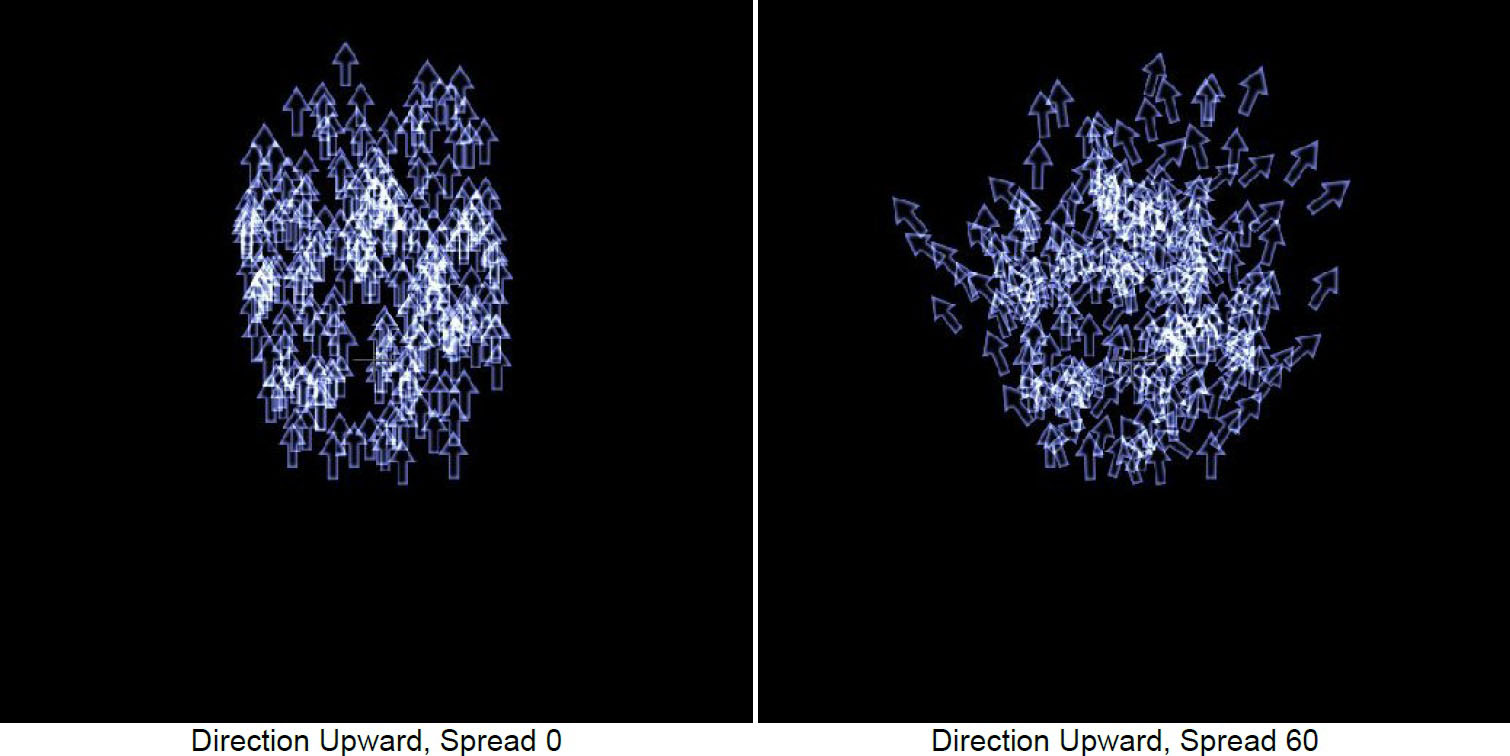
Direction and Spread: These parameters are used to determine the direction the particles are moving as they are born out of the emitter shape.
Gravity: Positive Gravity values will pull the particles downward and negative values will pull them
Rhythm, Rhythm Speed, and Burst Duration: By default the particle flow from the emitter is continuous, but there are options for emitting particles in a more Randomized way, as well as using regular or randomized Bursts.
Acceleration Type, Acceleration Impulse, and Acceleration Mix: By default the particles use a Constant velocity when emitted but there are options for Explosive (decelerating over the course of the particle lifespan) or Accelerating velocity.
Inertia from Emitter %: When moving the emitter position this Inertia can make it so particles are affected by that movement creating a realistic look to many effects.
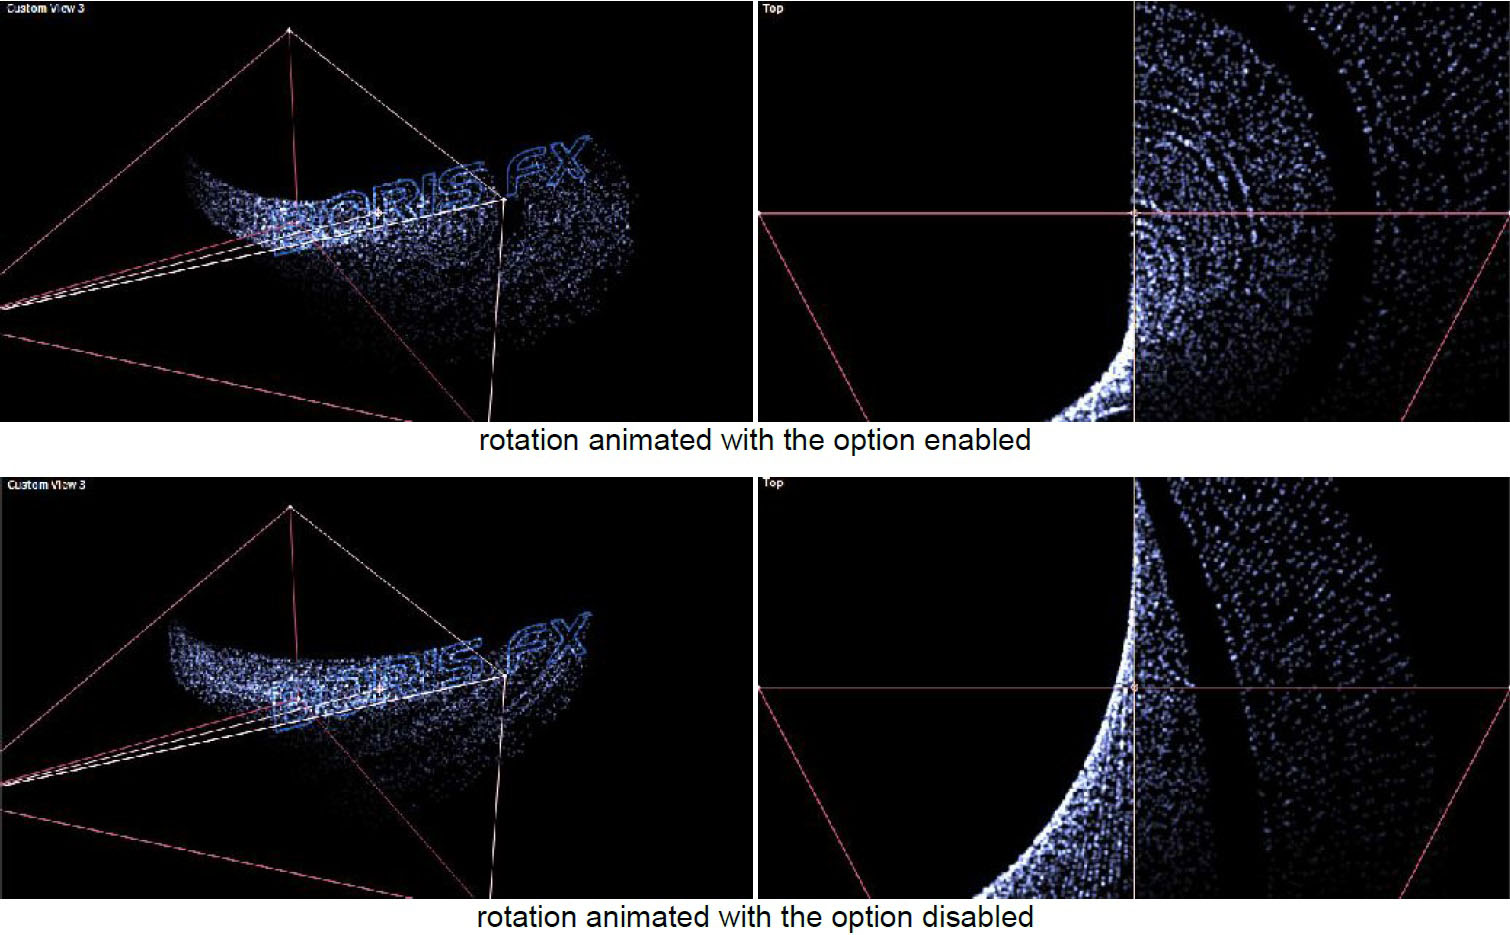
Rotate X, Rotate Y, Rotate Z: Rotation controls on 3 axes for the emitter shape. Since these rotations do not affect particles already born changes to these rotations are not always so obvious unless animating the rotation and previewing the animation (rather than just viewing a still frame while adjusting).
Scale Master, Scale X, Y, and Z: Scale controls for the emitter shape.
Pre-Run (secs): Provides the option of having the effect appear as though particles have already been emitting before the start of the effect – rather than the first frame of the effect always starting with no particles.
Time Scale and Time Scale Affects: Determines the scaling of the physics time – so it is possible to speed up the overall movement of the particles (Movement and Rotation, including affects of Gravity) without changing the pattern of movement that would result from adjusting any of these parameters individually.
Time Jump and Time Jump Random %: “Time Jump” skips a given amount of physics time. For example if it is set to 1 second, then when particles begin their life, they are already 1 second advanced in their movement.
Time Resolution: When the emitter is moving very fast and changing direction rapidly and / or following smooth curves it sometimes helps to increase the Time Resolution from it’s default to get particle trails that conform well to the motion path. Increasing Time Resolution can slow down the effect’s performance a bit so it is recommended not to increase it unnecessarily.
Particles
Particle Shape: Determines the kind of particle the emitter uses. Depending on the kind of particle used here, some other options in the plugin will be enabled or disabled.
Image Collection: The Image Collection popup menu reads particle images found within the “Image Collection – Particle” directory generally found here ;
On Windows systems – C:\Program Files (x86)\Boris FX, Inc\Image Collection – Particle
On Mac OS systems – Macintosh HD/Library/Application Support/BorisFX/Image Collection – Particle
The BCC installer places a collection of images there and users can add more images there as well. One advantage to using particle images from the Image Collection (rather using an AE layer from the comp) is that these images can be included in saved filter presets. Image Collection graphics can be .tif, .tiff, .bmp, and .jpg files and it is recommended to use power of 2 sizes such as 128×128 pixels, 256×256 pixels, 512×512 pixels, etc. for best performance.
Size and Size Random %: Controls the size of the particles and allows for randomizing the size between particles.
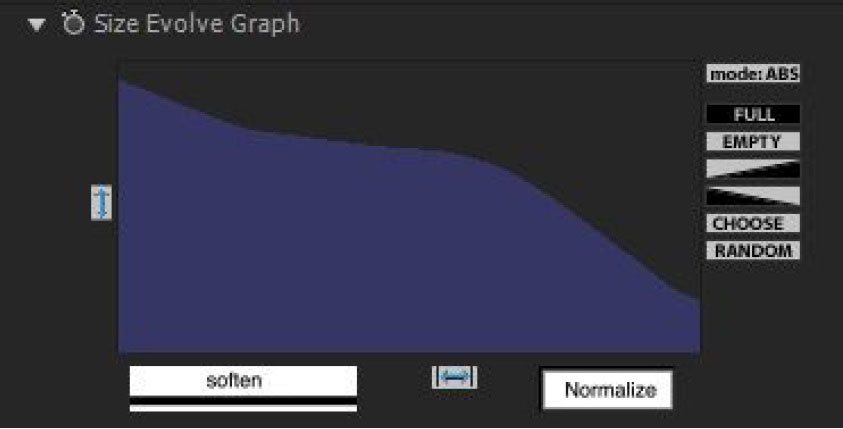
Use Size Evolution and Size Evolve Graph: When Use Size Evolution is enabled it is possible to use the Size Evolve Graph to animate the particles size over the particle lifetime. In the graphs, the left most edge represents the time of particle birth and the right most edge represents the time of particle death, while the top of the graph represents higher values and the bottom represents lower.
Graph Control Graph UI
Graph Buttons: The graph includes buttons for flipping the graph horizontally and vertically, buttons for making the graph FULL (completely blue color) or EMPTY (completely black color) or half and half using even diagonals. The RANDOM button will generate a random graph and it can be useful to try clicking this button repeatedly watching the graph and the effect on the particle array to spot interesting results. The CHOOSE button cycles through a series of preset graphs. These preset graphs can be used as they are or modified in various ways. By keyframing the graph itself it’s also possible to interpolate between them.
There are also buttons to Soften or Normalize the graph (see illustration below).
Moving the cursor over the graph display itself results in a different cursor display and clicking and dragging within the graph allows for freehand drawing to edit the graph. The “mode” button toggles between 2 different graph editing modes (and different cursors) ; Absolute (ABS) mode will completely redraw the area of the graph in which the mouse drag occurs, while Relative (+/-) mode will either extend or carve away from the blue area depending on where the cursor is when the click/drag begins. The cursor shows a “+” (plus) sign when in the blue area of the graph and clicking and dragging then will allow for adding to the blue area, and the cursor shows a “-” (minus) sign when in the black area and clicking and dragging then will allow for subtracting from the blue area. When editing the graph by hand the result is sometimes not so smooth but clicking the “soften” button a few times can smooth it out nicely.
Color Mode: Determines how the plugin defines the color for the particles ;
- Current Color uses whatever the color chip currently is.
- Birth Color uses whatever the color chip was at the time the particle was born. If the Color parameter is not animated Current and Birth Color will give the same results.
- Gradient Random uses the colors from the gradient and randomly assigns them to particles.
- Gradient Evolve uses the colors from the gradient with the first color parameters (the left most colors in the gradient display) being the color at birth and the right most color being the color at the end of the particle life.
- Layer Random uses the colors from another layer and randomly assigns them to particles.
- Layer Evolve choices use colors from another layer mapping them in relation to particle life.
- From Comp Lights uses the color of AE light(s) in the comp to define the particle color.
Color, Color Gradient, Color Layer, and Color from Comp Lights: Depending on what Color Mode is set to, these controls are used to define the color of the particles
Gradient
The BCC Gradient group enables complex, multi-color gradients for use in a variety of effect settings such as colorizing light sources.
For more information on the BCC Gradient tool, Click Here.
Material Shininess and Material Specular Color: For 3D Particle Shapes using lights (AE or Built-In) these parameters define the specularity of the surface lighting
Opacity and Opacity Evolve Graph: Opacity control with a graph for defining opacity over the lifetime of the particles (the graph works exactly like the Size Evolve Graph described earlier in this document)
Blend Mode and Blend Mix: Options for defining the Blend mode between particles with a parameter for mixing back to Normal blend.
Image Layer and Layer Mode: For selecting an AE layer to be used as a particle, along with options about how the color and alpha of the layer are used by the particles.
Mix-in Particle Color: When using an Image Layer for the particles, it is possible to have the layer’s color mix with the color from filters particle color parameters (enabled) or have the color parameters alone determine the color (disabled).
Sample Mode and Num Frames: For an animated Image Layer, options for how it samples the frames from the layer.
Shape Character: This parameter makes the 3D Discs to appear with hollow centers and it can change the 3D Cylinders into Cone shapes.
Feather Blurs: When using a Particle Shape of Round Blurs, this parameter controls the softness of the blur.
Auto-Orient to Camera: When Auto-Orient is enabled, 3D particles’ orientation in relation to the camera is maintained regardless of the camera perspective or system rotations. This is useful for some types of effects. The Auto Orient setting does not apply to other (non-3D) Particle Types since those types always face the camera regardless of perspective or rotations.
Image Facing: An option for having the particles auto-oriented in relation to the direction they are moving (does not apply to 3D particle shapes).
Image Layer 2 – 7: Controls for additional image layers.
Transform Particle
Randomize Orientation: Allows for randomizing the initial orientation between particles.
Auto-Rotate Speed and Auto-Rotate Random %: Speed control and Randomization between particles for auto-rotation around Z axis.
Auto Rotate Bi-Directional: When enabled Auto Rotation will occur in both directions with some particles auto-rotating clockwise and some counter clockwise.
Scale XYZ: Scale control for particles along each axis (Z is only enabled for 3D particle shapes).
Rotate, Rotate Random %, and Bi-Directional Rotation: Rotation around the Z axis (non auto- animating).
Tumble, Auto-Tumble Speed, Tumble Random %, and Bi-Directional Tumble: Rotation around X axis (these Tumble controls only available for 3D particle shapes).
Spin, Auto-Spin Speed, Spin Random %, and Bi-Directional Spin: Rotation around Y axis (these Spin controls only available for 3D particle shapes).
Physics Mode [ External Forces or Interaction with Layers ]: Depending on which option is chosen here the corresponding parameter group and features will be enabled and available for use.
External Forces
Air Resistance and Air Resistance Affects: Air resistance amount control and a popup for selecting which particle attributes are affected by air resistance.
Wind XYZ: Wind controls in 3 axes.
Wind Gustiness, Wind Gust Freq, and Wind Gust Balance: Controls auto-animated gusts of wind.
Wind Gust : XYZ Individual: When enabled the gusts will be more randomized between X, Y, and Z.
Circular Movement, Circular Freq, Fade-in Circular Move: Applies a circular movement to the particles, with frequency control and the ability to fade in the effects of circular movement over the course of the particle lifetime (so circular movement increases and is greater toward the end of the particle lifetime.
Enable Sink Point and Sink Pos XYZ: Define a point that can draw the particles toward it.
Sink Time and Sink Pull: For adjusting the effects of the sink point.
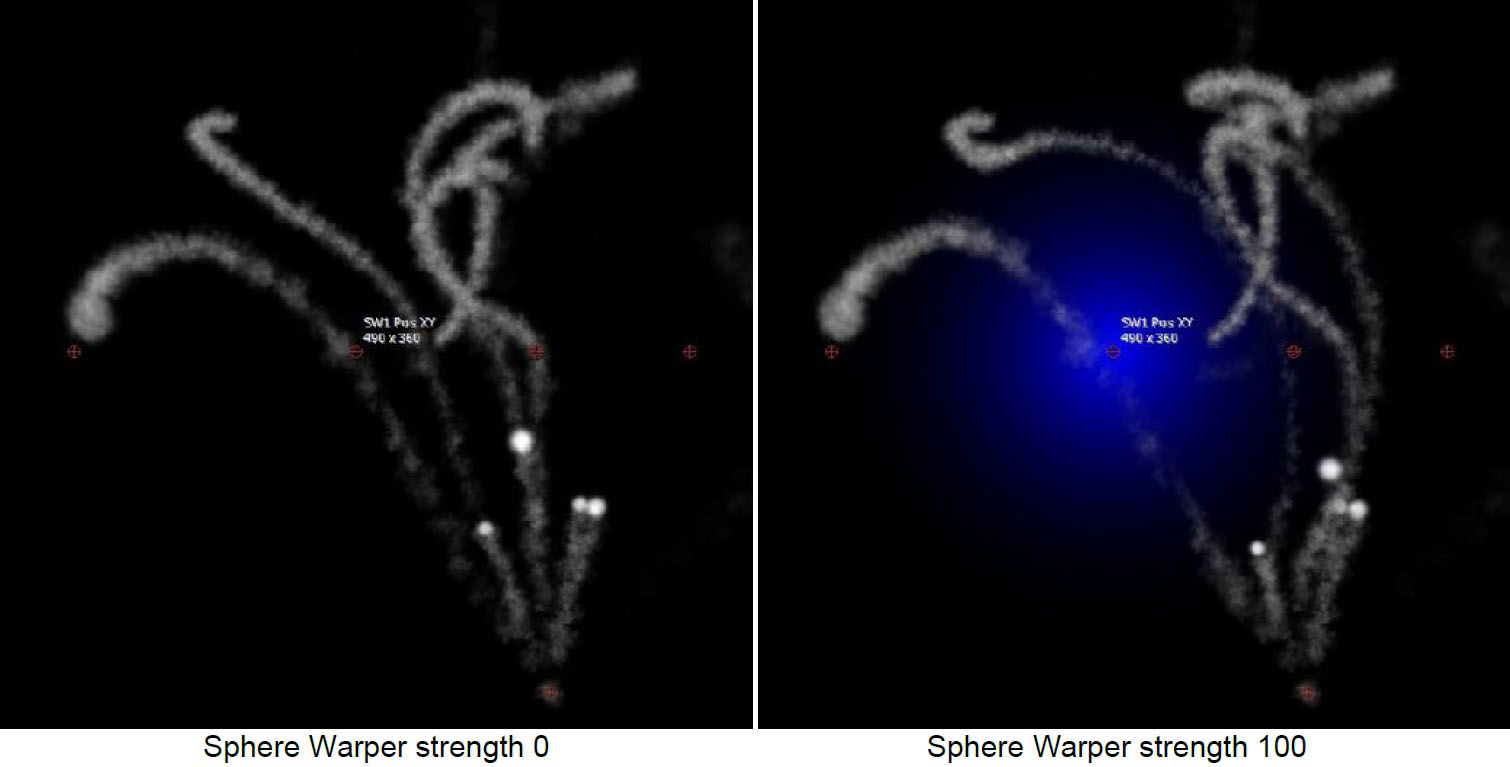
View Sphere Warpers: When enabled a sphere warper will display a blue or red preview onscreen (blue for positive strength values and red for negative).
SW Strength: Positive values will repel or displace particles while negative values will attract particles
SW Pos XYZ: 3D position for sphere warpers.
SW Radius and Feather: Control for sphere warper size (radius) and gradient force (feather).
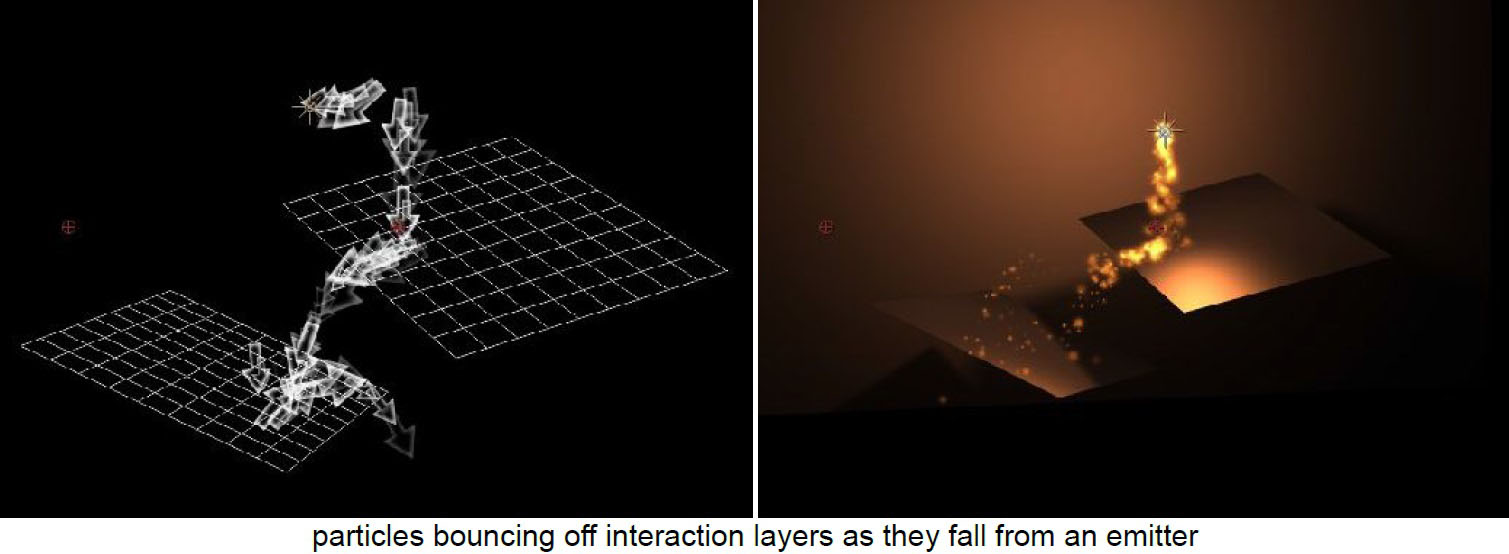
Interaction With Layers
Note – when using AE 3D Text layers as interaction layers, the text layers should be precomposed in AE at comp dimenions!
View Interaction Layers: Enables a white grid onscreen preview for interaction layers.
Layer Type: Choices for using a built-in plane or an AE 3D layer.
Interaction and Interact Probability %: Bounce, Stick, Slide, or Disappear with probability control.
Choose Layer: Where to choose an AE 3D layer (must be 3D layer to work as interaction layer).
Alpha Threshold: When using alpha layer type, this determines opacity threshold to interact with.
Friction and Friction Random: Adjust interaction and randomize it between particles.
Layer Pos XYZ, Layer Scale, Layer Rotation X,Y, and Z: 3D geometrics for interaction layers.
Fractal Field
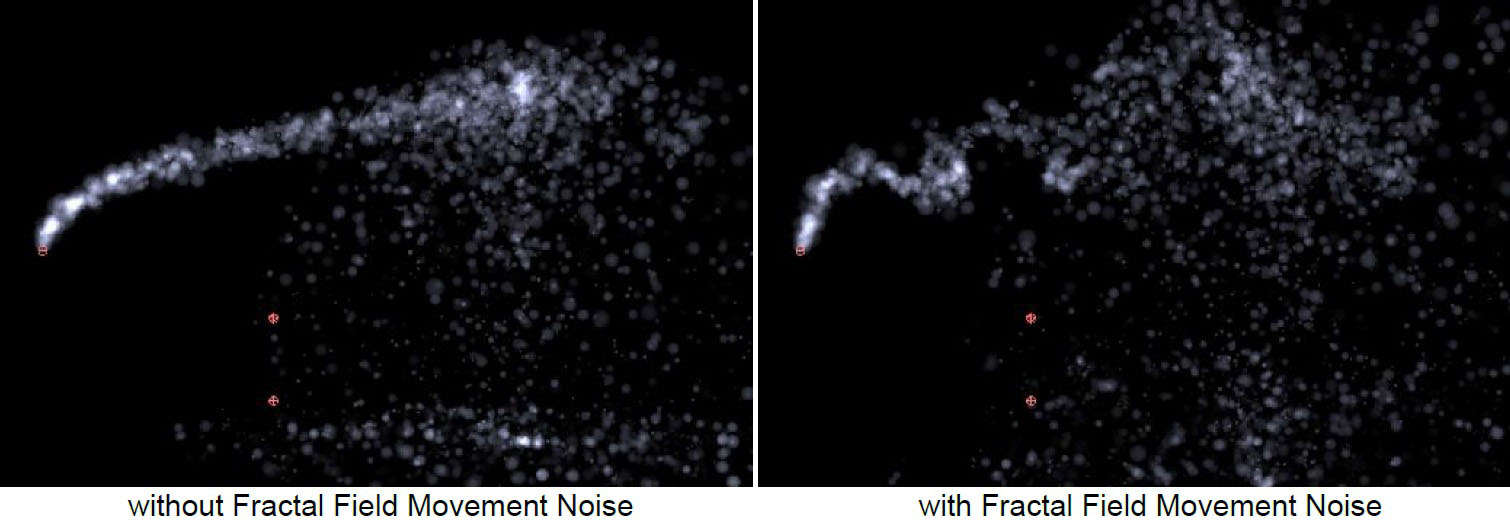
Movement Noise, Size Noise, and Opacity Noise: The amount the noise pattern affects particle position (movement), particle size, and particle opacity.
Strength X, Y, and Z: Individual axes control for Movement Noise.
Noise Freq and Freq X, Y, and Z: The frequency of the noise pattern, with individual control for XYZ.
Auto Evolve Speed and Auto Loop: Speed of noise auto-evolution as well as an option for specifying the number of seconds at which the noise evolution will seamlessly loop.
Evolve X, Y, and Z: Individual axes (non-auto-animating) control of noise pattern.
Individual Particle Noise: When this option is enabled, the particles follow different noise patterns for a more random appearance.
Noise Character: Options for different looks to the noise pattern.
Fade In Noise: Option for having the effects of the noise pattern fade in over the particles’ lifetime.
Wind affects Field: How much the noise field is affected by Wind in the External Forces group if it is being used.
Spawn Particles: (many of the parameters in this group have the same functionality as the corresponding parameters in the Particles group, so only the unique ones are described here to avoid repetition).
Spawn Particles: when spawn particles are born (Continuously, Particle Death, or Layer Interaction).
Spawn Shape: If spawn particles are set to use the same shape as the master particle and the master particle is using a 3D particle shape, then the spawns can appear as a 3D shape – otherwise spawn particles are limited to using 2D particle shapes.
Spawn Rate: The number of particles spawned for every main particle.
Rate Evolve: When set to spawn Continuously, this evolve graph allows for having the spawn rate evolve over the lifetime of the main particle.
Spawn Probability: Probability of a spawn being born (within parameters of the Spawn Particles choice) – can give a more organic randomized result.
Spawn Velocity: The amount of random velocity from the spawn itself (beyond inherited velocity).
Inherit Velocity, Inherit Velocity Mode: How much of the spawns’ velocity is inherited from the main particle and at what point in the main particle’s life that velocity is taken from.
Gravity: Gravity applied only to spawns, effect on spawn is in addition to main emitter gravity.
Inherit Size, Inherit Size Mode: How much of the spawns’ size is inherited from the main particle and at what point in the main particle’s life that size is taken from.
Inherit Color, Inherit Color Mode: How much of the spawns’ color is inherited from the main particle and at what point in the main particle’s life that color is taken from.
Inherit Opacity, Inherit Opacity Mode: How much of the spawns’ opacity is inherited from the main particle and at what point in the main particle’s life that opacity is taken from.
Inherit Rotation: How much of the spawns’ rotation is inherited from the main particle.
Add Randomized Rotation, Rotate Speed, Rotate Speed Random: Orientation and auto-rotation options for spawn particles.
Air Resistance Spawn, Wind Affects Spawn: How much the Air Resistance and Wind (form External Forces group) affects spawn particles.
Effects
Mirror Mode: Various options for achieving a symmetrical look to the array.
Disperse Master, Disperse X, Y, and Z: Disperses the particles from their original locations based on a random algorithm – a master control and control for dispersion along the individual 3D axes.
Disperse Variance: Allows for adjusting the range of random dispersion between the particles.
Transform System
Global Scale: Scale the overall particle effect including scale of the particles.
Center X, Y , and Z: 3D position of the overall particle effect.
Rotate X, Y, Z: Rotation on 3 axes – rotation is applied to overall effect and particles.
Lock Pivot, Pivot X, Y, and Z: Unlocking the pivot allows for offsetting 3D pivot from position.
World Rotate X, Y, and Z: World based rotation on 3 axes.
Built-in Camera
Camera Model: Position, Orbit: Camera offering 3D position and orientation control, or an orbit camera for easily adjusting perspective while remaining focused on the 3D center.
Field of View: An adjustment that can be used to simulate the look of various lenses – a large value gives a wide angle look.
Camera Position X, Y, and Z: 3D coordinate control for camera.
Camera Tumble, Spin, and Rotate: Controls for orientation of the position based camera.
Built-in Lights
Enable: 3 built in lights which can be individually enabled/disabled.
Ambient: Increasing this value gives some of the light color to the dark (unlit) areas.
Type: Determines whether the light will appear as a spot light or point light.
Light Intensity: Intensity of the light.
Specular Highlight: Determines how much the light contributes to any specular highlights on the particles – the color of the specular highlights is determined by the Material Specular parameter in the Particles group.
Color: The color of the light.
Position X, Y, and Z: 3D position of the light source.
Tumble and Spin: Determines the orientation of the light if it is a spotlight.
Spot Angle and Feather: For spotlight, these determine the angle of the light cone and the softness of spot edges.
Global Settings
Random Seed: There are several features in the plugin that use some kind of randomization to generate results (Fractal Field, Speed Randomness, Size Randomness, Opacity Randomness, etc.). Changing the Random Seed tweaks the random algorithms to produce a somewhat different result. It can be used to simply try a few different takes on an effect and it can also be used when you want another instance of the effect to look the same but not identical – give it a different Random Seed value.
Near and Far Clip Plane Adjust: These can be used to clip or extend the bounds of the area in which particles will appear.
Pos Z Use Pixel Units: When this is enabled, Position Z uses absolute pixel units.
Alpha Cutoff: Determines what alpha value is equivalent to zero for the particle renderer.
Z Sorting Mode: Defaults to true 3D, with options for sorting by birth order.
3D Slice and Stack Resolution: For 3D particle shapes, these determine the resolution (how many polygons) used to define the shape. Higher resolution values will result in slower performance. For effects where the particles appear small, it may be possible to lower the resolution values to get faster performance (without adversely affecting the appearance). For effects where the particles appear large, it is possible to increase the resolution values to give a smoother appearance to the shape.
Accessing Image Layers: Determines whether (and how) an animated Image Layer used as a particle will loop when the end is reached.
