NEW IN CONTINUUM 2021, the BCC+ Silk filter softens wrinkles, blemishes and fine detail to produce smooth skin textures while retaining detail in coarse features such as the eyes, nose and mouth.

Presets and the FX Editor
The FX Editor provides a convenient way to store and retrieve factory installed and/or user generated filter presets. To select a preset, open the FX Editor interface and pick one from the Presets panel. Click the apply button in the FX Editor to return to the host user interface.
To save a custom preset, click the “Create Custom Preset” icon in the top right corner of the parameter list, next to the filter name, set a name for the new custom preset in the dialog that appears and click done.
Filter Parameters
Detail
Smoothing: Fine image details, such as facial wrinkles and blemishes, are minimized using edge aware smoothing.
Color Correct
- Hue: Rotates the hue of the image.
- Saturation: Adjusts the saturation of the image. Positive values saturate, negative values desaturate.
- Brightness: Adjusts the brightness of the image. Positive values brighten, negative values darken.
- Contrast: Adjusts the contrast of the image. Positive values increase contrast, negative values decrease contrast.
- Gamma: Adjusts the gamma of the image. The gamma adjustment leaves the white and black points the same and only modifies the values in-between. Positive values lighten the midtones, negative values darken the midtones.
- Temperature: Sets the color of the image to be either warmer or cooler. Dragging the slider to the right makes the image cooler (bluer) and dragging the slider to the left makes the image warmer (redder).
- Cyan/Magenta: Adds either Cyan or Magenta to the image. Dragging the slider to the right makes the image more magenta and dragging the slider to the left makes the image more cyan.
- Red: Adds or subtracts red from the image.
- Green: Adds or subtracts green from the image.
- Blue: Adds or subtracts blue from the image.
Matte
A matte can be used to limit the smoothing effect. Wherever there is white in the matte is where the smoothing will occur.
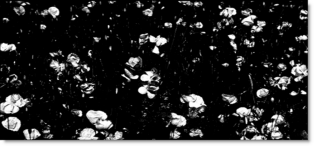
Position: Pinpoints the color values to be used in the matte. For a luminance matte, a Position value of 100 would make a white matte of the highlights and a value of 0 would make a white matte of the shadows. In the flower image below, look at how the matte varies for different Position values in a red extraction. When the Position is at a value of 100, the red flowers are shown as white in the matte.

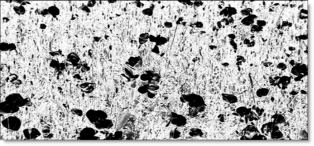
When the Position is moved to 50, the red flowers turn black.

Range: Increases or decreases the range of values in the matte. A low Range value indicates a narrow range of values. A high Range value indicates a large range of values included in the matte.
Blur: The matte is blurred by a quality blur.
PixelChooser: The BCC PixelChooser provides a way for the user to select which pixels in the filtered source are actually going to be affected by the filter, via the generation of image based mattes, gradient mattes and vector shape masks. Mocha planar tracking and vector shape masking options are included in the PixelChooser, which allows for the generation of motion-tracked mask shapes as a hold-back mask.
For more information on the PixelChooser, Click Here.
Working with The Filter
- Apply BCC+ Silk from the BCC Optical Diffusion unit.
- Click the BCC FX Editor button. The FX Editor user interface opens and consists of Presets, Parameters and Viewer windows.
- Try out some of the presets.
- Adjust Detail > Smoothing to smooth out fine detail.Smoothing uses an edge aware smoothing algorithm to minimize fine image detail so that areas with courser detail are unaffected. However, if there are unwanted areas of the image that are being affected, you can optionally use a matte to isolate the effect.
- Activate Matte > Enable.
- Change your View to Matte to see the matte values.The idea here is to generate a matte that isolates the areas of the image that need to be smoothed. For instance, you might be trying to isolate and smooth the skin on a person’s face. The white areas of the matte are the areas that will be smoothed. The matte has been preset to a highlight luminance matte, but this can be easily changed.
- Select the appropriate Matte > Extract On option for your image.
- If needed, change the Matte > Position parameter so that the image areas you are trying to smooth are as white as possible in the matte.
- Adjust the Matte > Range value so that the white values of the matte are limited as much as possible to the image areas that you are trying to isolate.
- Increase the Matte > Blur parameter if you want to soften the transition areas of the matte.
- Change your View to Output to see the filtered image.
- Adjust the Color Correct > Temperature control to your liking.
- Click the Apply button to return to the host application.
The values of the parameter adjustments in the FX Editor user interface are transferred to your host application.