Overview
Velocity Remap allows you to adjust and animate the frame rate of a video image and to blend adjacent frames to create smoother motion effects.
Function
You can apply Velocity Remap directly to the layer you want to affect, however, the duration of the effect is then limited to the duration of the source media. To create a Velocity Remap effect that is longer than the duration of the source media, follow the steps below.
1. Create a solid (After Effects, Premiere Pro), Color track (Red) or slug (Final Cut Pro) that is the same size as the desired source layer. Assign the desired duration to the solid or slug.
2. Apply the BCC Velocity Remap filter to the solid or slug.
3. Choose the desired layer in the Source Layer menu.
4. Adjust the other parameters as needed.
- Warning: If you delete the source clip from the timeline, the effect becomes unrendered.
Presets and Common Controls
BCC filters come with a library of factory installed presets plus the ability to create your own custom presets and preview them with the BCC FX Browser™.
BCC filters also include common controls that configure global effect preferences and other host-specific effect settings.
For more information about working with presets and other common controls, Click Here.
The Source Layer menu sets which clip in the timeline is affected by the filter.
Velocity adjusts the velocity of the source layer, expressed as a percentage of the frame rate. If Velocity is 100, the source moves at the normal frame rate. If Velocity is 50, the source moves half as fast as the clip’s frame rate. If Velocity is 0, the source is a static image.
Source Start determines which frame in the Source Layer used as the first frame in the effect.
Select the Frame Blending (Best Only) checkbox to enable frame blending.
The Frame Blending Mode menu determines how adjacent frames are mixed when frame blending is performed. Several of the modes are adjusted by the Boost Extra 1 and Boost Extra 2 parameters, whose function depends on which mode is used. Frame Blending Mode, Blur Amount, and Boost Extra 1 and 2 have no affect when Frame Blending is off.
- When Fast is chosen, the first frame fades out as the second frame fades in simultaneously. All pixels are affected equally, regardless of their channel values. Boost Extra 1 and Boost Extra 2 have no effect when Fast is chosen.
- Fast Opaque Source causes the second frame to fade over the first frame. All pixels are affected equally, regardless of their channel values. Boost Extra 1 and Boost Extra 2 have no effect when Fast Opaque Source is chosen.
- Temporal Blur averages two or more source frames to produce each output frame. When this option is chosen, Blur Amount determines how much blur is applied.
- Boost Exponential blends the color channels in the adjacent frames by subtracting an offset value from each pixel, exponentiating the value, adding the results, and then adding back the offset. When you use this mode, Boost Extra 1 controls the exponent that is used in the calculations, and Boost Extra 2 sets the offset value that is subtracted.
- Boost Equal Power Pos. is modeled on the audio concept of an equal power crossfade. This algorithm emphasizes the light pixels in the blend, which is useful when working with darker images. Boost Extra 1 and Boost Extra 2 have no effect when Boost Equal Power Pos. is chosen.
- Boost Equal Power Neg. is similar to Boost Equal Power Pos., but emphasizes the dark pixels in the blend. This is useful when working with lighter images. Boost Extra 1 and Boost Extra 2 have no effect when Boost Equal Power Neg. is chosen.
- Boost Bias blends adjacent frames by increasing the contrast of pixels whose channel values are furthest from Boost Extra 2 value. The contrast is weighted by the Boost Extra 1 value, and therefore is left unchanged if Extra 1 is set to 0.
When Frame Blending is set to Temporal Blur, Temporal Blur Amount sets the width of the blur in frames. For example, if Blur Amount is set to 5, the current frame is averaged with the following five frames to produce the output frame. When Blur Amount is 0, no Frame Blending is performed.
Boost Mix mixes the chosen Frame Blending Mode with the Fast Frame Blending Mode. When Boost Mix is set to 100, the selected Frame Blending Mode (and the Extra 1 and Extra 2 settings where applicable) are used. When Boost Mix is set to 0, the Fast mode is used. Intermediate values mix the chosen mode with the Fast mode to varying degrees.
The Composite Curves menu allows you to composite the curve over the Source Layer or the entire composition.
- Curves composites the curve over a black background.
- Curves Over Layer composites the curve over the Source Layer.
- Curves Over Comp composites the curve over the entire composition.
If the source is opaque, Curves Over Layer and Curves Over Comp produce the same result.
Frame Curve Parameter Group
The Frame Curve Parameters are preview displays which enable you to view a curve that graphs the frame in the Source Layer used to render each frame in the effect. Select the View Curve checkbox to display the time curve. Deselect this option to view the effect.
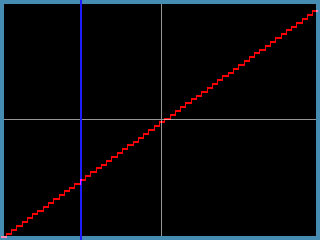
This illustration shows a frame curve for a Velocity Remap effect. The vertical blue line represents the current time. The X axis represents time (measured in frames), and the Y axis represents the source frame number. In this effect, Source Start is 0 and Velocity is 0. The first frame in the effect corresponds to frame 0 in the source. This point is represented by the far left point on the curve. As the effect progresses and the source frame increases, the curve climbs.
 |
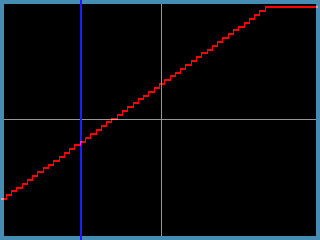
In this example, Source Start is increased to 10, moving the curve upwards along the Y axis. The curve is cut off on the far right side because the Y axis is not tall enough to show the last 10 frames of the effect. The scale of the Y axis can be changed using the Output Time View parameter.
 |
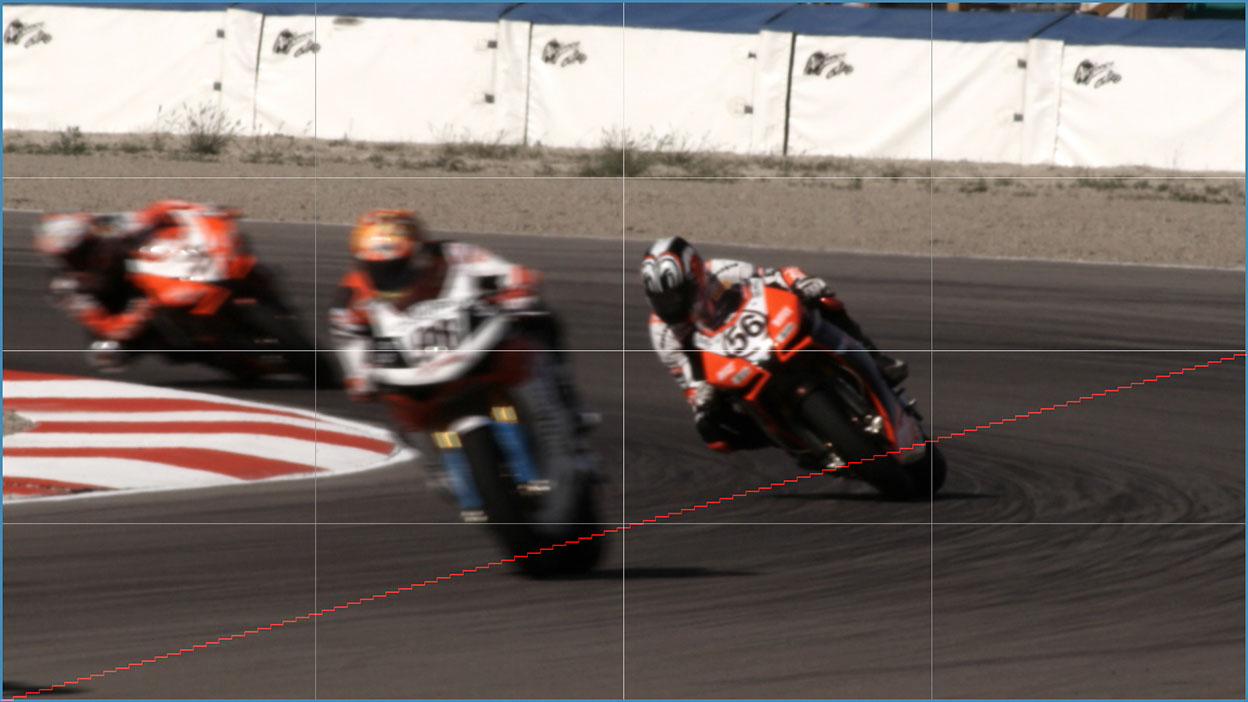
In this example, Velocity is increased to 200, creating a steeper curve.
 |
Input Time View sets the scale of the X axis in the frame curve. Full Effect scales the X axis to the untrimmed length of the filtered layer. 16 Seconds, 8 Seconds, 4 Seconds, and 2 Seconds scale the X axis to the corresponding number of seconds centered around the position indicator.
Output Time View sets the scale of the Y axis in the frame curve. Full Effect scales the Y axis to the untrimmed length of the filtered layer. First 16 seconds, First 8 seconds, First 4 seconds, and First 2 seconds scale the Y axis to the corresponding number of seconds starting from the frame specified by Scroll Curves.
Scroll Curves sets the first frame that displays when Output Time View is First 16 seconds, First 8 seconds, First 4 seconds, or First 2 seconds. This parameter has no affect if Output Time View is set to Full Effect.
