Gradient Shaders
In this section we will cover the Gradient IP Shader available in Title Studio with Continuum 2019. The Gradient Shader allows you to add a user definable multi-color gradient across the entire texture. This is different from the traditional Title Studio Gradient, which maps the gradient texture to each individual letter. With the Gradient Shader, you have up to 5 stops of color control over the entire texture.

The LEFT image shows a text level gradient. Notice how the gradient is applied to each letter. On the RIGHT the Gradient Shader applies a gradient to the entire texture.
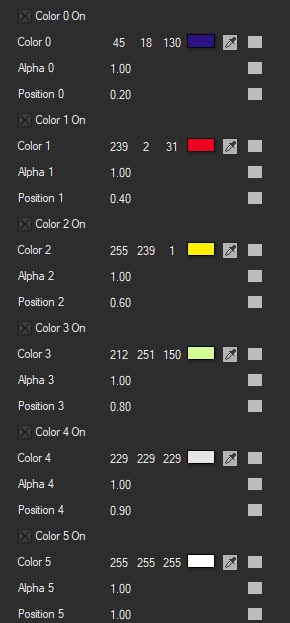
The Gradient Shader allows you to set up to five seperate color points. By default all five colors are enabled when you first apply the shader. Each one can be individually toggled on/off by selecting the corresponding Color On checkbox. By deafult, Color 0 is the leftmost color in the gradient, while Color 5 is the rightmost
Each Color Stop allows you to select a color from the Color Chip or Eye Dropper, as well as adjust the amount of Alpha for that specific color. Higher Alpha values will result in a fully opaque color, while lower Alpha values will result in more transparent colors.
PROTIP: For best results with Alpha, it is recomended that you apply the gradient directly to the object, as opposed to the scene. This restricts the gradient shader to the object instead of the whole scene, allowing for more customizeable Alpha looks.
Position changes the location of the individual color gradient.
You can change the gradient Type by selecting either Linear or Radial from the drop down menu. Linear gradients order the selected colors from left to right, while Radial cycles the colors in a circular arrangement emanating from the interior of the object.
Circle Type selects options for how Gradient types behave. There are three options available in Title Studio:
- None is the default. The gradient is applied in a single iteration from left to right. When this option is selected, the Loop parameter has no effect.
- Mirror reflects each gradient iteration across the texture. So, for example, if your gradient consisted of Red, Blue and Green, multiple looped iterations would be shown as Red, Blue, Green, Green, Blue, Red.
- Repeat simply repeats the gradient color order across iterations.
Ease InOut blends the color iterations with higher values producing softer results.
Loop increases the number of gradient iterations, with higher values producing more iterations.
Angle sets the angle of the gradient, while Offset X and Offset Y allow you to move the center of the gradient along the X or Y axis.
Noise Intensity increases the amount of noise present in the gradient, with higher results producing noisier results.
You can also set the Noise Color Type to Black & White or Color to customize the look.
Lastly, enabling Noise Alpha will allow the noise to appear across Alpha regions in your image.


