Light Ray Shaders
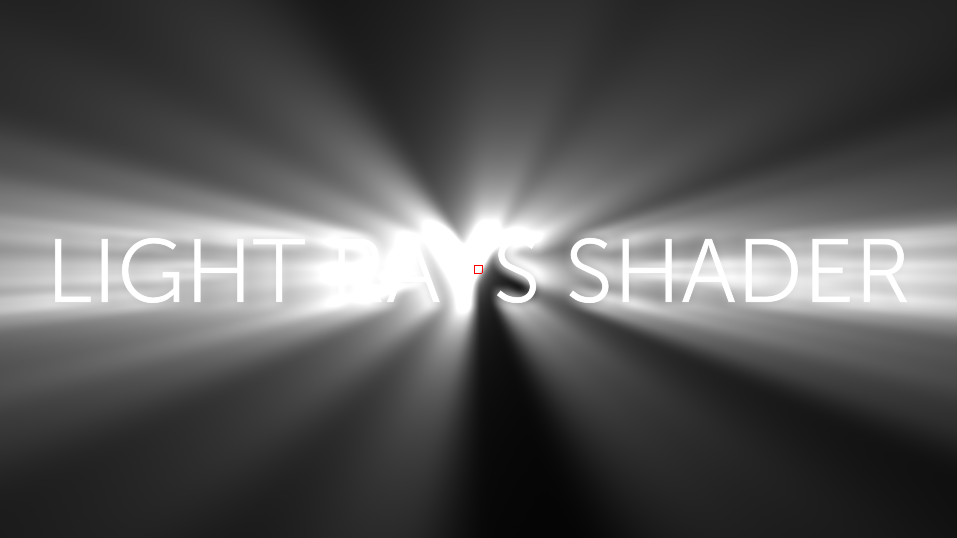
In this section we will cover the Light Ray IP Shader available in Title Studio with Continuum 2019. Light Rays generate visible rays of volumetric light that allow the viewer to see beams of light shining through the environment, similar to light shining through a cathedral window. The generated light beams can take their color from the scene or from a user specified color or gradient. This shader is typically applied to a scene or shape, however unique effects can result when applied to a material texture. There are a number of parameter tabs available to Light Ray IP Shaders which control the Material Attributes, Shimmer, Smoke and Gradient.
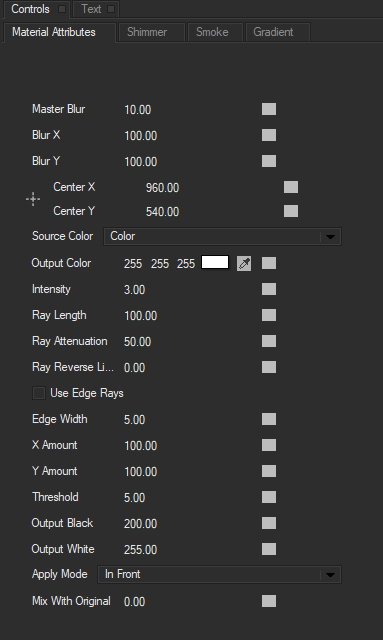
Material Attribute Parameters
These paramters control the basic function and look of the Light Rays. Here you can adjust the intensity, direction and overall style of the Rays themselves.
As with Glow and Blur shaders, the Master Blur parameter controls the overall blur of the light rays. Lower values will produce sharper results, while higher values will produce softer results.
Blur X controls the overall level of blur along the x axis. Higher values will produce softer results.
Blur Y controls the overall level of blur along the y axis. Higher values will produce softer results.
Center X controls the center point of the light source along the x axis. The Source Point can be manually adjusted using the on screen widget.
Center Y controls the center point of the light source along the x axis. The Source Point can be manually adjusted using the on screen widget.
Source Color allows the the selection for the basis of the source color. From the dropdown menu three options can be selected:
- Color allows for the manual selection of the light ray color by changing the Output Color with the color chip or eyedropper. When color is selected, the Gradient Parameter tab is disabled.
- Source Image bases the color of the light rays on the color from the original object. For example, red text will produce red colored light rays. When Source Image is selected, the Output Color and Gradient Parameter Tab are disabled.
- Gradient allows the user to assign multiple colors and adjust alpha values via the Gradient Parameter Tab. When Gradient is selected, Output Color and Source Image selections are disabled.
Output Color allows for the manual selection of light ray color. Selections can be made via the color chip or eyedropper. Output color is only available when Color is selected from the Source Color drop down menu.
Intensity controls the brightness of the light rays. Higher values will result in brighter, more intense light rays, while lower values will result in fainter, less intense rays.
Ray Length controls the overall length of light ray emanating from the source.
Ray Attenuation fine tunes the amplitude and intensity of the light source
Ray Reverse Light changes the direction of the light rays. Higher values move the light behind the object.
Use Edge Rays wraps the light around the edge of the object, creating a more natural and more intense blooming.
Edge Width is only available when Use Edge Rays has been enabled. This parameter allows the user to set the amount of edge pixels Light Rays will use. Higher values will result in wider edge pixels and therefore more intense light rays.
X & Y Amount are only available when Use Edge Rays has been enabled. These parameters control the amount of light ray wrapping around the X and Y axis. Lower values will result in fewer light rays wrapping around the respective edges.
Threshold is only available when Use Edge Rays has been enabled. This sets the pixel values that are affected by the light rays. Lower values apply the light rays to more pixels in the object, while higher values will apply the light rays to fewer pixels.
Apply Mode allows you to select how the rays composite on the object or scene. You can select Behind, In Front, Screen and Add.

In this example the light rays have been composited Behind and In Front of the object to produce very different results.
Mix With Original blends the light ray effect back with the unfiltered input object.
Shimmer Tab
Shimmer creates additional flickering rays of light eminating from the source point.
Amount controls the number of shimmering rays. Higher values will produce more streaks.
Detail controls the sharpness of the shimmer. Lower values will produce fainter streaks, while higher values will produce more detailed streaks.
Rate controls the speed of the shimmer. Higher vaules will produce faster, more noticible shimmering, while lower values will produce subtle shimmering.
Random Seed simply adjusts the randomness of the shimmering. You can use this parameter to introduce more or less randomness into the animation.
Smoke Tab
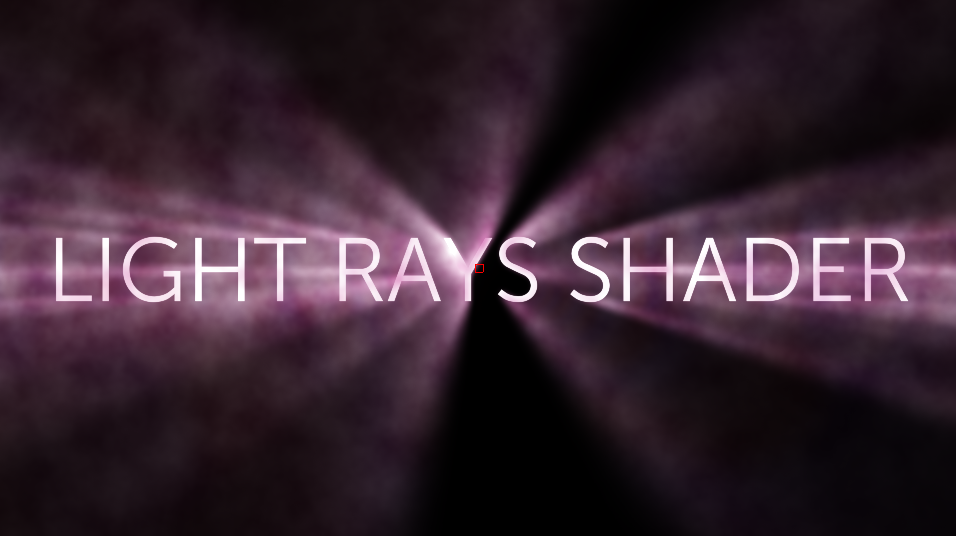
Here we can create detailed fog and clouding in our light rays by adding a foggy appearance to the light source.
Intensity increases or decreases the intensity of the smoke visible in the scene. Higher values will produce more intense smoke effects, while lower values will produce more subtle effects.
Rate controls the speed of the smoke’s evolution. Higher values will produce faster moving smoke, while a value of zero will produce no movement in the smoke.
Rotate changes the angle of the fog.
Scale changes the scale of the fog, with smaller values producing more detailed smoke effects.
Random Seed introduces random patterns to the fog effect.
Color allows you to use the color chip or eyedropper to set the color of the smoke. This does not change the color of the light source, only the smoke itself.
Mix With Original blends the smoke with the original effect.
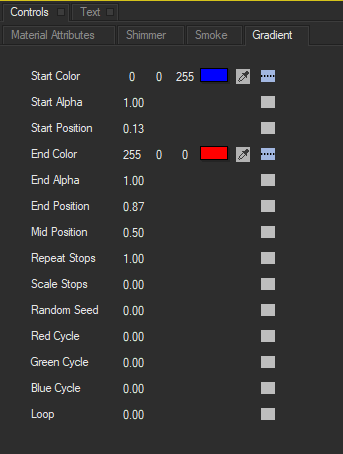
Gradient Tab
Gradient effects are only available when the Source Color has been set to Gradient. Controls in this parameter allow the user to assign a gradient to the light source color instead of a solid color.
Start Color allows you to use the color chip or eyedropper to set the first color of the gradient.
Start Alpha allows you to set the alpha value for the first color of the gradient. Higher values will result in a more transparent image.
Start Position allows you to set the starting point of the first color in the gradient. Higher values will position it further from the source point.
End Color allows you to use the color chip or eyedropper to set the second color of the gradient.
End Alpha allows you to set the alpha value for the second color of the gradient. Higher values will result in a more transparent image.
End Position allows you to set the starting point of the second color in the gradient. Higher values will position it further from the source point.
Mid Position allows you to set the median point between the first and second colors in the gradient.
Repeat Stops repeats the gradient color order across multiple iterations.
Scale Stops scales the gradient color order across iterations.
Random Seed introduces randomness into the gradient.
Red Cycle adjusts the amount of red value in the RGB mix.
Green Cycle adjusts the amount of green value in the RGB mix.
Blue Cycle adjusts the amount of blue value in the RGB mix.
Loop increases the number of gradient iterations, with higher values producing more iterations.


