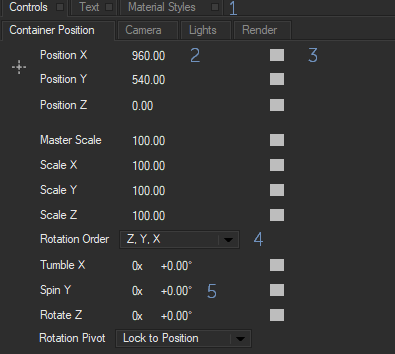
The Controls Window displays the animatable parameters for each track, organized into one or more tabs. The tabs available depend on which track is selected in the Timeline as all tracks have parameters that are specific to them. The Controls window allows you to adjust the values for each parameter and choose how to interpolate those values between keyframes. For information on individual parameter groups please click here.
- Parameter Groups
Click tabs to display the various parameter controls for each group. The available groups and parameters are track specific and will depend on which track has been selected in the timeline. - Parameter Values
Displays the current value of the associated parameter. You can click to manually input a value, or scrub the parameter to adjust the value. Different parameters have different maximum values. Holding the pointer over a parameter will display its minimum and maximum value. Holding Shift while scrubbing will enable faster scrubbing, while holding the Alt (Windows) or Option (Mac) will enable slower scrubbing for fine tuning values. - Interpolation Parameter
Title Studio animates between keyframes based on what kind of interpolation you select. Each style of interpolation can change the look of your effect in various ways.- Constant Interpolation does not create keyframes. Changes to the parameter have a global effect on the project.
- Hold freezes the parameter value. The effect will not change until another keyframe is placed on the timeline.
- Linear Interpolation creates a smooth and constant progression between two keyframe parameters.
- Accelerate Interpolation will gradually speed up the animation between two keyframes.
- Decelerate Interpolation will gradually slow down the animation between two keyframes.
- Ease In/Ease Out Interpolation is a combination of Accelerate and Decelerate, providing speeding up from the first keyframe, and slowing down as it progresses to the second.
- Reset resets the parameter back to its default value and removes any keyframe.
- Drop Down Menu
Click to choose additional options or behaviors. For example, switching between point and spotlights. Depending on the option, different parameters may become available. - Degree Sliders
Degree Sliders are used for parameters whose values are measured in degrees, such as angles or hue values around the color wheel. Scrub the degree value as you would any other parameter. What makes a Degree Slider different is that it has a separate numerical field for revolutions, allowing you to animate parameters over values greater than 360°. For example, entering 2 in the Revolutions field means that the object would rotate 360° twice.
Return to Main Title Studio Page.
